Emscripten 支援 main 作為起點的執行方式,但實際使用上還是會以直接呼叫function 為主,實際應用上會以需要大量運算的部分為主,可以加速網頁的運算,也可以將不想公開的程式碼隱藏其中。
- 測試C語言時,可以使用 main function 搭配簡單的指令測試,方便開發,以下是測試時使用的C++內容(encode_decode.cpp),將其放在隨便一個資料夾即可。
#include <cstdlib>
#include <cstring>
#include <string>   //string
#include <sstream>  //string buffer
#include <iomanip>  //int_to_hex
#include <cctype>   //toUpper

// If this is an Emscripten (WebAssembly) build then...(因為只有用emcc 才會有這個標頭檔)
#ifdef __EMSCRIPTEN__
  #include <emscripten.h>
#endif

#ifdef __cplusplus
extern "C" { // So that the C++ compiler does not rename our function names(為了支援C函式庫內的函式)
#endif

//較快速的轉大寫方式
char ascii_toupper_char(char c) {
    return ('a' <= c && c <= 'z') ? c^0x20 : c;    // ^ autovectorizes to PXOR: runs on more ports than paddb
}

//跑過整個字串
// gcc can only auto-vectorize loops when the number of iterations is known before the first iteration.  strlen gives us that
size_t strtoupper_autovec(char *dst, const char *src) {
    size_t len = strlen(src);
      // printf("strlen = %d\n",len);
    for (size_t i=0 ; i<len ; ++i) {
        dst[i] = ascii_toupper_char(src[i]);  // gcc does the vector range check with psubusb / pcmpeqb instead of pcmpgtb
    }
    return len;
}

#ifdef __EMSCRIPTEN__
  EMSCRIPTEN_KEEPALIVE
#endif
  int encode(char* tmp_cmds, char* tmp_return)
  {
    size_t cmds_length = strlen(tmp_cmds);
    std::stringstream transbuff;
		for(int x=0; x < cmds_length; x++) {
      int c1 = 255 - tmp_cmds[x];
      std::stringstream tmp_sb;
      tmp_sb << std::hex << c1;
      char convertUpper[] = "FF";
      std::string s(tmp_sb.str());
      tmp_sb.str("");
      const char* strSource = s.c_str();
      strtoupper_autovec(convertUpper,strSource);
      transbuff << convertUpper;
		}
    std::string revbuff(transbuff.str());
    transbuff.str("");
    strcpy(tmp_return, revbuff.c_str());
    return 1;
  }

#ifdef __EMSCRIPTEN__
  EMSCRIPTEN_KEEPALIVE
#endif
  int decode(char* tmp_cmds, char* tmp_return)
  {
    size_t cmds_length = strlen(tmp_cmds);
    std::string revbuff(tmp_cmds);
    std::stringstream tmp_result;
    std::string tmpHex;
    char * p;
    int num = 0;
		for(int x = 0; x < cmds_length; x = x + 2) {
      tmpHex = revbuff.substr(x,2);
      num = strtol(tmpHex.c_str(), &p, 16);
      num = 255 - num;
      tmp_result << (char)num;
		}
    strcpy(tmp_return, tmp_result.str().c_str());
    tmp_result.str("");
    return 1;
  }
#ifdef __cplusplus
}


//編譯成網頁用檔案,注意_free _malloc 要指定不然不能用(跟書上不同)
//emcc encode_decode.cpp -o encoder.js -s EXTRA_EXPORTED_RUNTIME_METHODS=['ccall','UTF8ToString'] -s 'EXPORTED_FUNCTIONS=["_free","_malloc"]'
//直接測試
// emcc encode_decode.cpp -o encode.html
int main(){
	char a[] = "THIS is test msg 12345";
  int cmds_length = sizeof(a)/sizeof(char) - 1;
  char b[cmds_length * 2];
	printf("origin: %s\n", a);
	encode(a,b);
  size_t cmds_len = strlen(b);
	printf("encode: %s\n", b);
  int encode_length = sizeof(b)/sizeof(char) - 1;
  char c[encode_length / 2];
  decode(b,c);
	printf("decode: %s\n", c);
	return 0;
}

#endif
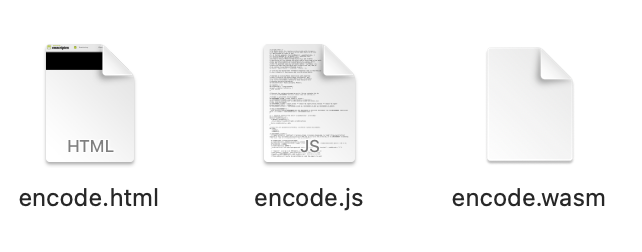
在確認 Emscripten 安裝正常後,在這個資料夾使用以下指令
emcc encode_decode.cpp -o encode.html

輸出指定為html 型態時,會產生出一個可以直接打開測試用的網頁與相關檔案,以上指令會產生出
encode.html
encode.js
encode.wasm
接著要使用python 在此目錄下開啟簡單的web server
python -m http.server 8080就可以在瀏覽器網址中輸入 “http://localhost:8080/encode.html” 來測試剛剛所寫的程式碼,因為剛剛的程式碼內包含了main function,打開後會自動執行,並將程式內的printf 所輸出的文字印在網頁上,執行內容如下
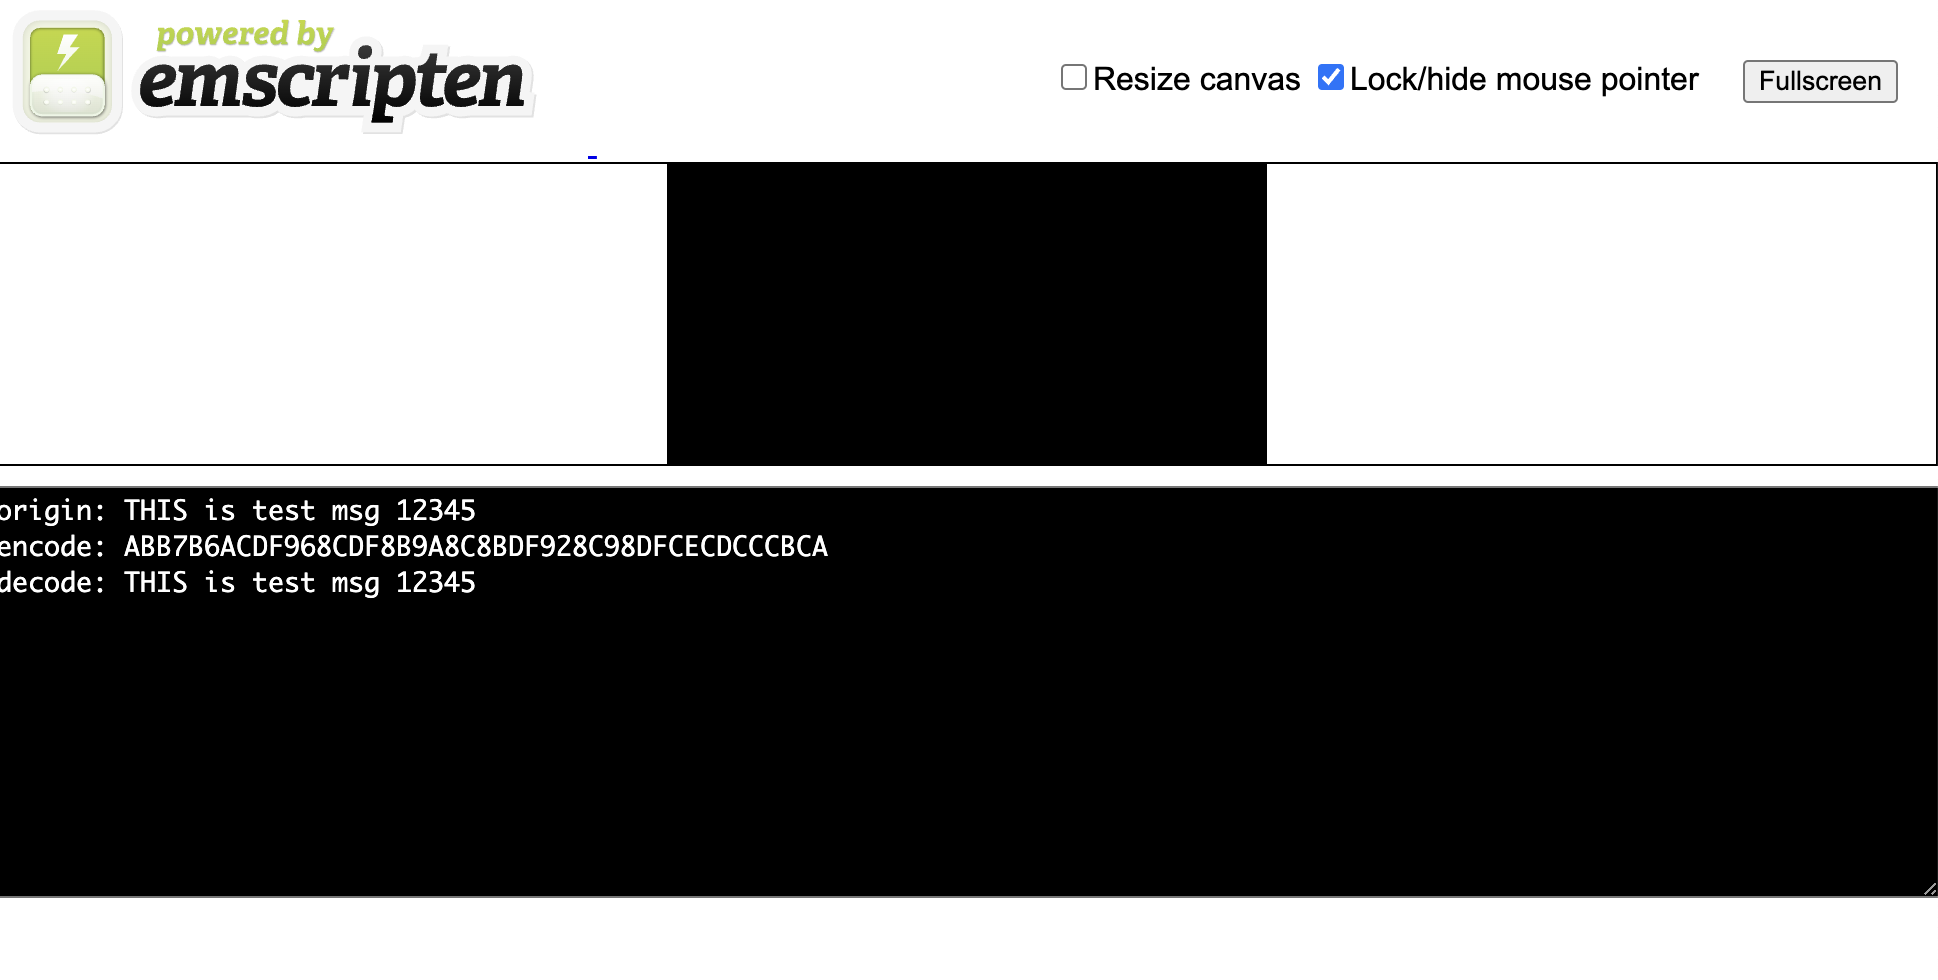
至此,已經完成最基本的wasm 流程
- 如果想在網頁中使用encode / decode 等function,需要做以下調整
- 將上述程式碼內的main function 移除
- 另外寫一份html / js 來讀取並使用 wasm
- 修改編譯方式,使其不產生出html檔案
調整後的 encode_decode.cpp程式碼
#include <cstdlib>
#include <cstring>
#include <string> //string
#include <sstream> //string buffer
#include <iomanip> //int_to_hex
#include <cctype> //toUpper
// If this is an Emscripten (WebAssembly) build then...(因為只有用emcc 才會有這個標頭檔)
#ifdef __EMSCRIPTEN__
#include <emscripten.h>
#endif
#ifdef __cplusplus
extern "C" { // So that the C++ compiler does not rename our function names(為了支援C函式庫內的函式)
#endif
//較快速的轉大寫方式
char ascii_toupper_char(char c) {
return ('a' <= c && c <= 'z') ? c^0x20 : c; // ^ autovectorizes to PXOR: runs on more ports than paddb
}
//跑過整個字串
// gcc can only auto-vectorize loops when the number of iterations is known before the first iteration. strlen gives us that
size_t strtoupper_autovec(char *dst, const char *src) {
size_t len = strlen(src);
// printf("strlen = %d\n",len);
for (size_t i=0 ; i<len ; ++i) {
dst[i] = ascii_toupper_char(src[i]); // gcc does the vector range check with psubusb / pcmpeqb instead of pcmpgtb
}
return len;
}
#ifdef __EMSCRIPTEN__
EMSCRIPTEN_KEEPALIVE
#endif
int encode(char* tmp_cmds, char* tmp_return)
{
size_t cmds_length = strlen(tmp_cmds);
std::stringstream transbuff;
for(int x=0; x < cmds_length; x++) {
int c1 = 255 - tmp_cmds[x];
std::stringstream tmp_sb;
tmp_sb << std::hex << c1;
char convertUpper[] = "FF";
std::string s(tmp_sb.str());
tmp_sb.str("");
const char* strSource = s.c_str();
strtoupper_autovec(convertUpper,strSource);
transbuff << convertUpper;
}
std::string revbuff(transbuff.str());
transbuff.str("");
strcpy(tmp_return, revbuff.c_str());
return 1;
}
#ifdef __EMSCRIPTEN__
EMSCRIPTEN_KEEPALIVE
#endif
int decode(char* tmp_cmds, char* tmp_return)
{
size_t cmds_length = strlen(tmp_cmds);
std::string revbuff(tmp_cmds);
std::stringstream tmp_result;
std::string tmpHex;
char * p;
int num = 0;
for(int x = 0; x < cmds_length; x = x + 2) {
tmpHex = revbuff.substr(x,2);
num = strtol(tmpHex.c_str(), &p, 16);
num = 255 - num;
tmp_result << (char)num;
}
strcpy(tmp_return, tmp_result.str().c_str());
tmp_result.str("");
return 1;
}
#ifdef __cplusplus
}
//編譯成網頁用檔案,注意_free _malloc 要指定不然不能用(跟書上不同)
//emcc encode_decode.cpp -o encoder.js -s EXTRA_EXPORTED_RUNTIME_METHODS=['ccall','UTF8ToString'] -s 'EXPORTED_FUNCTIONS=["_free","_malloc"]'
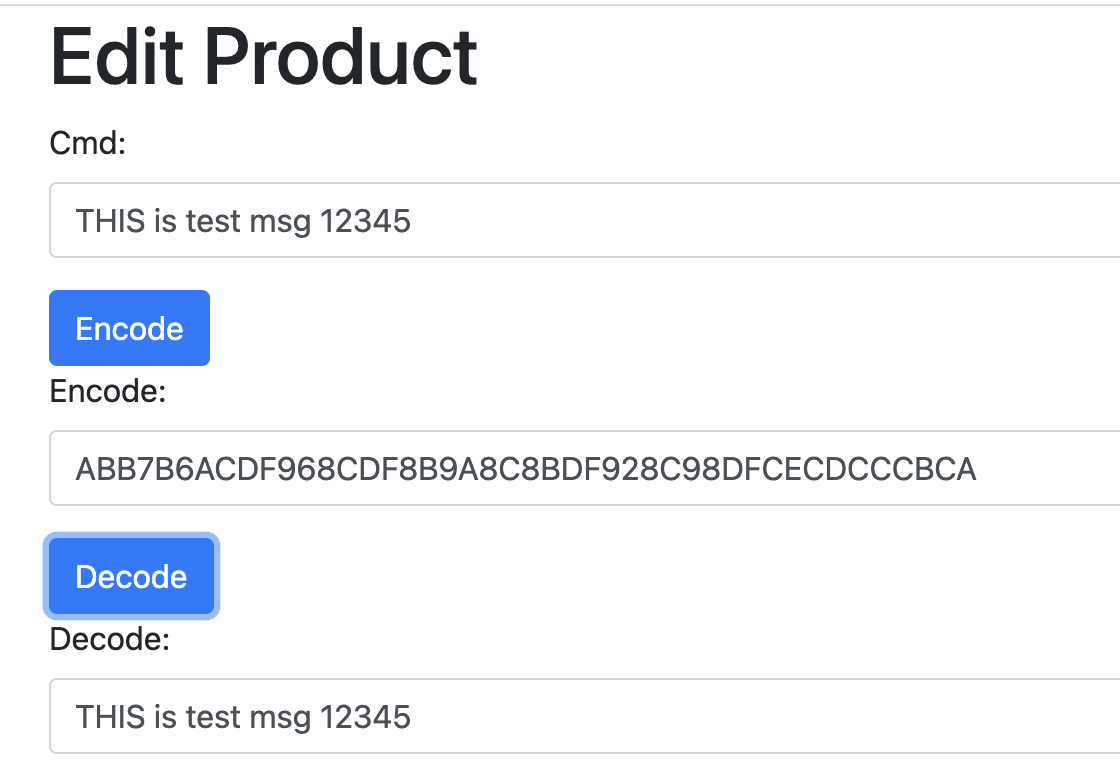
#endif另外準備一個 test_encoder.html,內容如下
<!DOCTYPE html>
<html>
  <head>
    <title>Edit Product</title>
    <meta charset="utf-8"/>
    <meta name="viewport" content="width=device-width, initial-scale=1">
    <link rel="stylesheet" href="https://maxcdn.bootstrapcdn.com/bootstrap/4.1.0/css/bootstrap.min.css">
    <script src="https://ajax.googleapis.com/ajax/libs/jquery/3.3.1/jquery.min.js"></script>
    <script src="https://cdnjs.cloudflare.com/ajax/libs/popper.js/1.14.0/umd/popper.min.js"></script>
    <script src="https://maxcdn.bootstrapcdn.com/bootstrap/4.1.0/js/bootstrap.min.js"></script>
  </head>
  <body onload="initializePage()">
    <div class="container">
      <h1>Edit Product</h1>

      <div id="errorMessage" class="alert alert-danger" role="alert" style="display:none;">
      </div>

      <div class="form-group">
        <label for="name">Cmd:</label>
        <input type="text" class="form-control" id="cmd">
      </div>
      <button type="button" class="btn btn-primary" onclick="onClickEncode()">Encode</button>
      <div class="form-group">
        <label for="name">Encode:</label>
        <input type="text" class="form-control" id="encodeCmd">
      </div>
      <button type="button" class="btn btn-primary" onclick="onClickDecode()">Decode</button>
      <div class="form-group">
        <label for="name">Decode:</label>
        <input type="text" class="form-control" id="decodeCmd">
      </div>
    </div>

    <script src="test_encoder.js"></script>
    <script src="encoder.js"></script>
  </body>
</html>
與一份test_encoder.js,內容如下
const initialData = {
  name: "THIS is test msg 12345"
};

function initializePage() {
  document.getElementById("cmd").value = initialData.name;
}

function onClickEncode(){
  var start = Date.now();
  var cmd = document.getElementById("cmd").value;
  var encodedCmd = encode(cmd);
  document.getElementById("encodeCmd").value = encodedCmd;
}

function onClickDecode(){
  var start = Date.now();
  var cmd = document.getElementById("encodeCmd").value;
  var decodedCmd = decode(cmd);
  document.getElementById("decodeCmd").value = decodedCmd;
}

function encode(cmd) {
  let result = "";
  const resultPointer = Module._malloc((cmd.length +1) * 2);  //取得一塊記憶體給回傳的指標使用
  const isValid = Module.ccall('encode',        //C++ 內的函式名稱
      'number',                                 //回傳型態(int = number)
      ['string', 'number'],                     //傳入參數第一個為字串,第二個是為了C++回傳字串指標,所以是number
      [cmd, resultPointer]);                    //傳入的參數
  if (isValid === 1) {                          //收到的回傳數值
    result = Module.UTF8ToString(resultPointer);//使用內建的UTF8ToString,由字串指標的位址將字串取出
  }
  Module._free(resultPointer);                  //釋放記憶體
  return result;
}

function decode(cmd) {
  let result = "";
  const resultPointer = Module._malloc(cmd.length / 2);
  const isValid = Module.ccall('decode',
      'number',
      ['string', 'number'],
      [cmd, resultPointer]);
  if (isValid === 1) {
    result = Module.UTF8ToString(resultPointer);
  }
  Module._free(resultPointer);
  return result;
}
接著使用以下指令重新編譯並產生出 encoder.js
emcc encode_decode.cpp -o encoder.js -s EXTRA_EXPORTED_RUNTIME_METHODS=['ccall','UTF8ToString'] -s 'EXPORTED_FUNCTIONS=["_free","_malloc"]'

1. output 檔案改成encoder.js,編譯器會自動不產生html檔
2. -s EXTRA_EXPORTED_RUNTIME_METHODS 表明了會在js 中使用到的 wasm function
    其中ccall 是拿來呼叫 C++ 檔案內function 使用的
     UTF8ToString 則是將回傳的指標轉換回js 字串使用
3. -s 'EXPORTED_FUNCTIONS=["_free","_malloc"]' 是為了在js 中可以使用malloc 取得記憶體,與free 釋放記憶體
    舊版本不需要特別指定這段,但是目前的版本不指定則會找不到該function
做完以上動作,即可打開瀏覽器,輸入“http://localhost:8080/test_encoder.html”
點擊 Encode 時會呼叫 wasm 內的encode function 並將Cmd 中的字串輸入進去,取得的結果將會顯示在Encode 欄位中。
點擊Decode 時會呼叫wasm 內的decode function 並將 Encode 中的字串輸入進去,並將解碼後的結果顯示在Decode 欄位中。